If you want to build your own sauna, know that the project can seem deceptively simple! It is ultimately pretty straight forward, but there are a few details you have to get right. You’ll need to answer questions about your sauna’s location and whether you want an indoor or outdoor sauna. And you’ll also want to understand the different types of saunas and their heating sources, as well as what materials you’ll need to build your own quality sauna. In general, the steps to building a sauna are pretty straight forward.
The basic steps for building your own sauna are:
- Choose the location-indoor or outdoor?
- Identify the type of sauna you want (steam, infrared?)
- Decide how to heat it (traditional stove and rocks? Electric heating element? Gas-fired heater?)
- Pick your materials (Type of wood, insulation, windows, etc.) and build it!
Home saunas offer relaxation, enjoyment, and health benefits. You don’t have to spend a fortune hiring a professional to custom-build you a sauna. If you love DIY projects and have basic skills, you can build your own sauna and then kick back and admire your own work as you destress in the sauna that is just right for you. We’ll discuss all of this, but first let’s look at a question you’re almost certainly asking yourself at this point: how much is this going to cost?
How Much Will it Cost to Build Your Own Sauna?

Building your own sauna can range from being fairly inexpensive to very costly, ranging from a couple of thousand dollars to over ten thousand. The total cost depends on the size and type of your sauna, materials used (new versus repurposed), the type of wood, extras like windows, and whether you hire people to help with wiring and construction.
The biggest factors affecting cost are the type of wood (cedar is the most expensive) and the type of materials you select.
It’s possible to find used components through websites like Craigslist or stores like Habitat for Humanity. It may be harder to find the right parts, though, when you look for used materials. If your goal is to have a large, fancy sauna without having to take the time to hunt down the right materials, your cost will be higher.
If you enjoy the process of searching for materials and creating a unique, rustic-looking sauna, you just might end up loving the journey and the final product and protecting your wallet.
Any number at this point will be wrong, but we can look at one that’s maybe useful. If we pick a sauna kit off Amazon like the Maxxus Saunas MX-J206-01 Seattle Carbon Far Infrared Sauna, we can see that the price of the kit alone, before labor to assemble or anything extra, is $2,100.
So, if you’re doing it yourself, you have the opportunity to get cheaper materials, or, indeed more expensive parts and pieces? What does this mean? If you’re on a shoestring budget, then this is a fair number to try and cap your spending at. Past that, you’ll be trading budget for features unique to your sauna.
How to Pick the Location for Your Sauna
Unless you’re using a cheap portable sauna option like this one from Amazon, the location of your sauna is important, as it will affect the rest of your decisions as well as your long-term enjoyment. Saunas are for relaxation.
The ideal location for a sauna is one that brings you a sense of peace when you’re enjoying it on the inside as well as when you’re looking at it from the outside. Also, you want to choose a location that will be easy to actually set up.
Indoor vs. Outdoor
Home saunas can be built inside your home or outdoors. Neither option is right or wrong. What you choose depends on your personal preference and your unique circumstances. Think about these factors:
- Your climate. If you live in an area with extreme weather conditions and a lot of precipitation or wind, an outdoor sauna will need to be sheltered from these elements to protect it from damage.
- Your space. A typical sauna ranges from about 3 feet by 3 feet to 8 feet by 12 feet, with some saunas a bit smaller or bigger. The size you want will dictate the amount of space you need.
If you want a small, cozy sauna for just one or two people, a small space is fine; however, if you want to invite several people over at a time, you’ll need to choose a location that will allow for a large structure. (Comfortable saunas allow for two feet of seated space or six feet of reclining space per person.)
- Your willingness to modify your home or yard. While both require preliminary prep work, an indoor sauna requires more than an outdoor sauna. An outdoor sauna requires you to level your surface and clear the area of obstructions.
An indoor sauna requires you to remove all existing drywall, exposing wall studs and ceiling joists, and to remove all porous flooring such as carpet.
- Safety. If you are building an outdoor sauna with a wood heat source, make sure to build it a safe distance away from your house or other structures. This will minimize the fire hazard.
Think about size as well as necessary work when choosing your sauna spot. Keep in mind, though, that while the project might be labor-intensive up front, the result will be years of relaxation and enjoyment.
While these are the primary factors to ponder when deciding where to place your sauna, there are other little details that can help you decide.
Special Considerations
Think of the nuts and bolts of building and operating a sauna unit as well as the overall aesthetics when deciding where to place it. Among the things to think about includes the power source, the water source, convenience, as well as the way everything looks, also known as “aesthetics.” Once you’ve chosen the location, it’s time to pick your sauna components.
We’ll explore a little more of each one of these factors:
- Power source. An eclectic or infrared sauna requires access to a 120v electrical outlet, ideally a ground fault circuit interrupter (GFCI), while a gas heater needs to be hooked to a gas line.
- Water source. Most people prefer their sauna to be near a source of water for cooling down. Easy access to a shower might be important for an indoor sauna, while an outdoor sauna might be more enjoyable if it’s near a lake, pond, river, pool, or outdoor shower.
- Convenience. The purpose of a sauna is to use it. If you locate it in an inconvenient spot, you might be less likely to use it.
- Aesthetics. How will your finished sauna look from the outside? Will it be a pleasant addition to your home or yard? If you don’t like the idea of starting at the structure, you might want to locate it out of your main view (but, again, consider convenience and ease-of-access to balance your choice.)
Pick Your Type of Sauna: Steam or Infrared

There are two main types of saunas: steam and infrared. Which you choose is a matter of personal preference.
Steam Saunas
Perhaps surprisingly because of their name, steam saunas can be either dry or humid. They use special rocks heated to the desired temperature. Often, people pour water over the rocks from time to time while they’re relaxing in the sauna in order to provide some humidity.
Otherwise, the sauna is extremely arid. Alternately, people burn wood instead of using heated rocks. When wood is used, water is not poured over the wood because that would extinguish the heat source.
Steam saunas become very hot, with temperatures ranging from about 150 to 195 degrees Fahrenheit. They heat the room, making you feel warm (or hot) and relaxed.
Even though many people use the terms interchangeably as we wrote in our article comparing saunas and steam rooms, they’re actually quite different from each other, moreover, they’re also different from infrared saunas as well.
Infrared saunas
Infrared saunas heat your body rather than just the room. This type of sauna doesn’t use the traditional box of rocks or wood but instead, electromagnetic radiation from infrared lamps stimulates your body’s perspiration process.
The heat in infrared saunas is always dry. There’s no need for a box of wood or stones because the heat comes from the lighting.
Many people like infrared saunas because they feel warmer while inside due to the fact that the heat comes from their own body. Infrared saunas make you feel warmer while maintaining a cooler room temperature than steam saunas.
This type of sauna temperature ranges from about 120 to 150 degrees Fahrenheit and tends to be more cost-efficient to operate.
Choosing Between Steam and Infrared
Both steam and infrared saunas offer relaxation and health benefits. Many people use saunas for health benefits and to feel better. Both types offer relaxation.
They can ease joint and muscle pain and can be good for people who are active or have health conditions that cause pain. Both can help with certain skin conditions, and they can be good for heart and lung health. Other considerations:
- Your own comfort level. Do you enjoy sitting in a very hot room, or do you prefer slightly less intense heat? When deciding which type of sauna to build, think of the heat factor.
- Personal taste. Do you want a traditional sauna with heated rocks or wood? If so, an infrared might not be right for you.
- Amount of DIY work. Infrared saunas typically require work provided by a professional electrician. If you have no electrical experience and want to do most of your work yourself, you might want to stick to a steam sauna.
Decide How to Heat your Sauna
There are different options for heating saunas. Heat sources include wood, gas, electricity, and infrared, and each style has its own pros, cons, advantages, and disadvantages which make them work looking into before buying.
Perhaps the most common, however, is the cedar wood sauna which produces that classic sauna smell most people associate with saunas.
Wood
Using wood in a wood-burning stove to heat a sauna is the classic method and is popular among people who are aiming for a traditional, outdoor, rustic sauna experience as well as for those who don’t have an electric power source near their desired location.
While it can offer a great sauna experience, wood often takes hours to heat a sauna to the full temperature, and when it does, the temperature reaches and maintains a very high heat.
Some welcome this intense heat, but others find it too uncomfortable and even dangerous. Also, wood isn’t a “set it and forget it” type of heat source. You must continue to stoke the fire during use which means you have to go out and buy the wood from a place that sells it.
If you live in a downtown urban area, this may not be the best option, however, if you live in a more rural community, this will be much easier.
Gas and Electricity
Gas and electric-fired saunas are easier to maintain than wood, and while they provide more of a traditional sauna experience than infrared heat, they aren’t quite as authentic as wood. They are easy to use and maintain, however, as they operate with the flick of a switch or turn of a knob.
An electric heater for a steam sauna doesn’t require the same fancy wiring as an infrared sauna needs; therefore, DIY’ers with little electrical experience can usually follow the manufacturer’s instructions to install and use.
It’s often a matter of installing the heater by centering it on a wall and screwing it in for support, ensuring there is proper ventilation for the heater, and plugging it in.
Gas heaters require a proper gas pipeline. It’s crucial to consider the pipe’s thickness as well as how many other appliances are serviced by the same line. If you’re installing a gas-powered heat source, you must consult with your local gas company.
Infrared
As we explained in more detail in our article on traditional versus infrared saunas, the latter require advanced wiring skills and techniques and are usually installed by a professional electrician.
Often, people who want an infrared sauna purchase premade sauna kits like this one from Amazon that are already wired and only need to be secured in place.
What Materials Should You Use for your DIY Sauna?
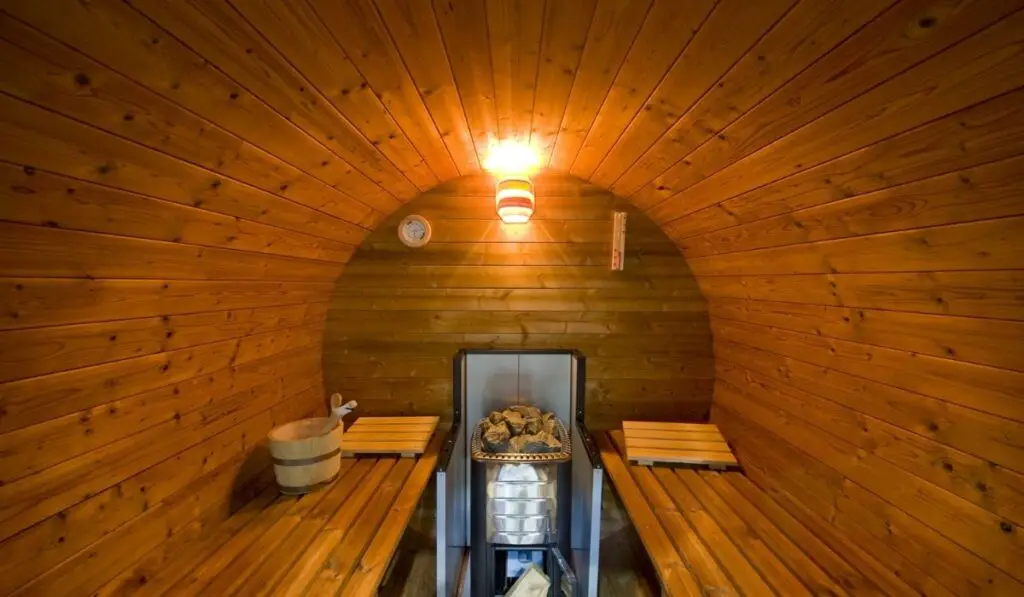
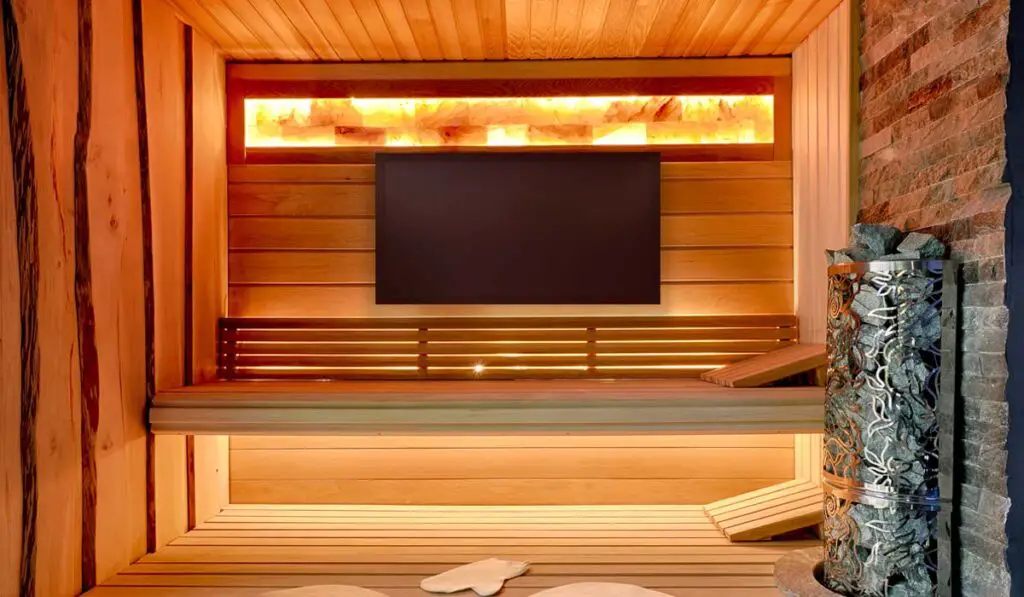
When you’re completely making your own sauna, you will need a few different materials including wood for the walls and ceiling, material for the foundation as well as a drain, insulation, a foil vapor barrier for indoor saunas, double-paned glass for windows (this is optional and only for those who want to be able to see in and out), a heater source and vents, a heater guard rail (this is also optional but worth considering because it can prevent burns, especially in a small sauna), a door, and finally, benches or sauna chairs.
Wood
Because of a sauna’s high moisture and heat, look for a softwood that is flexible and not easily warped or otherwise damaged. Cedar is the most popular wood for saunas because of its aroma, antibacterial and antifungal properties, and tendency to remain cooler and thus more comfortable to sit on than other woods.
However, cedar is also the most expensive. Other popular wood types for saunas include poplar, basswood, and the budget-friendly hemlock.
To save money, many people do construct their saunas out of whatever wood is in abundance locally. You have greater flexibility with your exterior wood than the interior.
For any interior wood that will come in contact with skin, it’s recommended that you use 100 percent clear-grain wood. Clear-grain wood doesn’t contain knots. Knots become extremely hot as the sauna heats and can cause burns which obviously no sauna user wants.
Foundation (Flooring)
Never place your sauna on carpet or bare ground for reasons that should seem obvious. Tile, vinyl, or wood make good foundations. Some people pour a concrete foundation. If you live in a climate with extremely cold temperatures, though, concrete might not be your best option as it retains the cold and makes heating your sauna less cost-efficient.
You can install a wood floor over your foundation. Some people recommend installing a drain on your sauna’s floor. While it isn’t absolutely necessary to include a drain (and might be impossible for an indoor sauna), having a drain can make it easier to clean. Another factor worth looking into is the type of insulation.
Insulation
Insulation is extremely important for your sauna as it helps retain the heat; it keeps operating costs down, and it can provide some soundproofing to enhance relaxation. After you’ve built the basic skeletal structure, add plenty of high-quality fiberglass insulation.
This is going to make a big difference in how well you’re able to maintain the sauna’s temperature, not unlike a house. A properly insulated home is also much easier to heat and cool.
Foil vapor barrier
If you are building an indoor sauna, adding a foil vapor barrier is important to protect the adjacent walls of your home from heat and moisture. This is available in rolls, and you cover your insulated structure completely, both the walls and ceiling.
Make sure there are no spaces between sheets by either overlapping the sheets or using foil tape between each piece.
Double-paned windows
Having windows in your sauna is a matter of personal preference because they’re certainly not necessary, although, they are nice. If you do opt for a view, make sure to use double-paned glass to retain heat and prevent condensation.
Once you’ve chosen and prepared a location, laid the foundation, done any necessary wiring, or hired an electrician, erected the walls and windows, and installed the insulation and foil vapor barrier, it’s time to place the wood planks on the walls, ceiling, and floor. Once this process is complete, you can install your heat source.
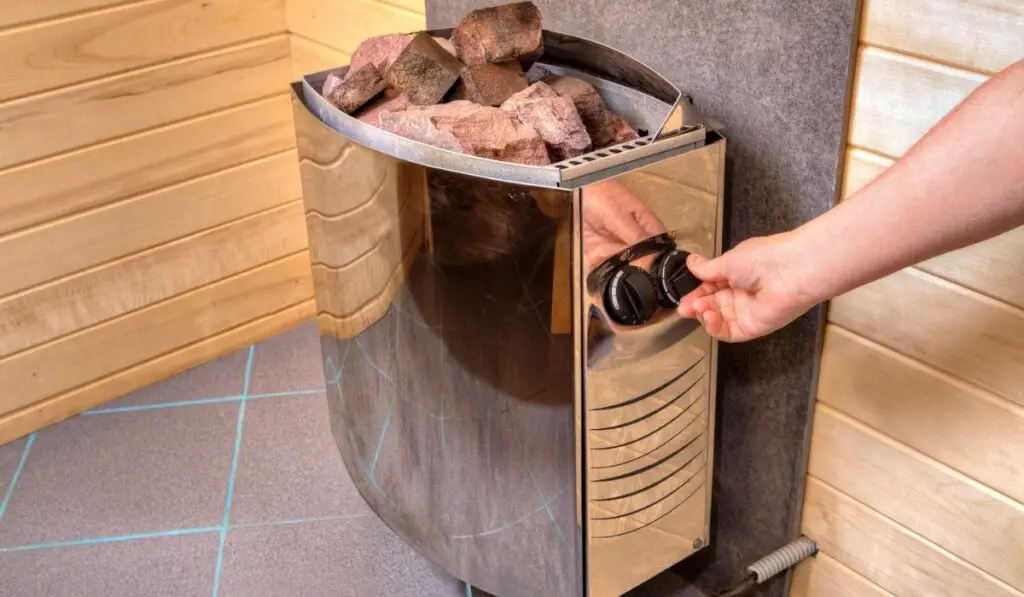
Heat source
Choose one of the heat sources discussed above. These are available in stores and online and, with the exception of infrared, are designed to be easy to install. Center your heater on a wall and follow the manufacturer’s instructions for proper, safe installation.
While each heater and brand is slightly different, heaters require some space on all sides, including underneath. Heaters should be vented, which can be as simple as cutting a hole in the outside wall behind the heater.
They simply need some cooler air to operate. The air doesn’t have to be cold. It just needs to be cooler than the inside of the sauna, which reaches more than 150 degrees. You can place a screen over the vent if desired.
If your sauna is small and people will frequently move close to the heat source, consider adding a heated guard rail. This is simply a wooden fence-like structure surrounding your heater to prevent contact.
Door
You’ll need a door on your sauna to retain the heat. As logic would have it, smaller-sized doors are more efficient as they let out less heat than a full-sized door when opened. This is the reason why sauna doors are rarely full-sized, if ever.
They would simply let out too much heat every time someone comes and goes into the sauna. You can make your own door or buy pre-made sauna doors.
Seating and Sauna Kits
Benches are a popular option because they not only provide a lot more room but they’re also great for offering more variability in temperature. Build benches into your sauna or purchase sauna chairs.
If your sauna is big enough, you might want to build two levels of benches. The upper level will be hotter, and the lower level will offer a slightly cooler place to relax. You can adjust your position to maintain comfort.
It’s possible to have a DIY sauna without building one entirely from scratch. Sauna kits are available from local and online retailers that provide the necessary materials, measured and prepared for you. You do still assemble these on your own. Kits are a nice way to build your own sauna without having to mess with every technical detail.